
After the storm . . . thankful for warmth, light and baking early
Posted: December 24, 2013 Filed under: Uncategorized 56 Comments
After the worst ice storm in Toronto’s history and more than 40 hours without power, I was losing hope that I’d see the bright lights of our lovely tree on Christmas Eve. But last night at dinner time our power was restored and we all did a little dance of joy.
I stayed up late to enjoy the lights of the tree and count my blessings. We are so thankful to have warmth and light for the holiday. Our greatest wish was to be able to cook our turkey dinner here at home on Christmas Day. Simple pleasures really do mean the most. This is the powerful reminder the ice storm has left behind.
It is such a hectic time of year so you can imagine the impact of this widespread outage with close to 250,000 homes and businesses without power. Our neighbourhood was hard hit and many of the small shops and businesses were out of commission for several days. Only one of the five grocery stores in the area was open yesterday. I battled the crowds and walked for 30 minutes with an 11 lb frozen turkey . . . so you know it is going to be the best turkey ever. Starbucks was wall-to-wall with people (including me) recharging their phones so that they could reconnect with friends and family. It brought out the best in everyone and we appreciated all of the offers for help.
But it hasn’t been a good week for those who leave things to the last minute.
While I typically count myself part of the last-minute crowd for many things, baking isn’t one of them. This is one time that I’m glad I had all of my baking done for the season. One of my favourite cookies this year was shortbreads. I made them several different ways and found this to be a real time saver. I’ve included photos and the recipe below.
I wish you all a very Merry Christmas with your family and friends. I hope that your Christmas is filled with simple pleasures. Our thoughts go out to the more than 125,000 homes in the Toronto area who are still waiting for power.

Shortbread
Recipe from Christmas Cookies from the Whimsical Bakehouse
4 cups all-purpose flour
1 cup icing sugar
¼ tsp salt
1 lb cold unsalted butter, cut into ½ cubees
Directions:
Preheat oven to 350˚.
Line two cookie sheets with parchment.
Sift together flour, sugar and salt in the bowl of an electric mixer.
Add butter and mix on low until the dough comes together.
On a lightly floured board, roll the dough out to a thickness of ¼ inch. Cut out your desired shape(s) using cookie cutters and arrange about an inch apart on the lined cookie sheets. Bake for 6 to 8 minutes for small cookies or 10 to 15 minutes for larger cookies, or until lightly coloured.
Let the cookies cool in the pans for 5 minutes, then transfer the cookies to a wire rack to cool completely.
Adaptation for Chocolate Shortbreads
Follow same recipe and method above except:
- replace 4 cups of all-purpose flour with 3.5 cups of all-purpose flour and ½ cup cocoa powder;
- add 2 extra tablespoons of cold unsalted butter
- Use a stocking shaped cookie cutter
- Prick each cookie once with a fork
- Once baked, dip the top of the stockings in melted white chocolate and sprinkle with smashed candy cane pieces
Adaptation for Cranberry Orange Shortbread
Follow basic shortbread recipe and method, but add a handful of chopped dried sweetened cranberries and zest of small orange. Mix well. Cut and bake.

Shortbreads three ways: Chocolate dipped shortbread stars; snowflakes sprinkled with sanding sugar and orange & cranberry shortbreads
Septemberissima
Posted: September 10, 2013 Filed under: Uncategorized | Tags: Amaretti, Crumble, Nigella, Plums 66 Comments
It’s September and I can’t stop thinking about Italy.
I guess it’s my way of not thinking about closed-toed shoes and the blurry-eyed, dark drives into work that are just around the corner. In fact, I’m so obsessed with Italy at the moment that I’ve taken to using the only three Italian expressions that I know—grazi, caio and prego—around the house.
My youngest ponytail looked at me with an odd expression at breakfast this weekend and said: “did you say pregnant?” Definitely not. No chance there. Thank you, but no. “I said you’re welcome . . . in Italian, and if you’re really, really, really good maybe we’ll go there someday.”
Because if I have my way, we’ll go there next summer as a family to celebrate our 10-year wedding anniversary. But alas, it’s still a dream of mine. I just need to convince the rest of my family that we need to go there . . . and then start saving my pennies loonies wherever humanly possible.
To keep my family in the right frame of mind, I’ve enlisted a little help from the domestic goddess and what has become my favourite Nigella cookbook: Nigellissima. I’ve already made three recipes from the book and I’ve flagged about 10 more to make as soon as possible. (And all three recipes have been highly rated by the ponytails!)
Given that plums are abundant in September, I decided to make Nigella’s Ruby-Red Plum & Amaretti Crumble this weekend. I really think that plums are an under-rated fruit, but this crumble could change all that. The crumble was wonderful and the amaretti in the topping is pure genius, if you ask me. I’ll be making this one again . . . soon!
So for all of you who love Italy as much as I do, I have one important question for you: Positano, Venice or Rome? Or perhaps all three?
Before I sign off, I must apologize for disappearing from the blogsphere this summer. I won’t bore you with all the details, but I will say that it has been a challenging year in a number of ways. I’ll do my best to stay in touch when I can . . . I hope you understand. I certainly have missed connecting with all of you and hope things turn around this fall.
Ciao for now!
Ruby-Red Plum & Amaretti Crumble
From Nigella Lawson’s Nigellissima
For the fruit base:
4 ounces Amaretti cookies
2 tbsp unsalted butter
2-1/4 pounds red plums, quartered if large, halved if small, pits removed
2 tbsp sugar
zest and juice of 1/2 lemon (unwaxed)
For the crumble topping:
1 cup all-purpose flour
1 tsp baking powder
7 tbsp cold unsalted butter, cut into osmall dice
3 tbsp sugar
1 9″ ovenproof pie dish
- Preheat the oven to 190C/375F/Gas 5 and slip in a baking sheet at the same time. Put the amaretti into a freezer bag and bash with a rolling pin or similar, until reduced to coarse crumbs, then decant them into a bowl.
- Melt the two tablespoons of butter in a large pan (that has a lid), add the prepared plums, sprinkle in the two tablespoons of sugar, add the lemon zest and juice and shake the pan over the heat, cooking for two minutes without a lid and two further minutes with the lid on. These timings are based on having plums that are ripe: if the fruit is disappointingly unyielding, be prepared to cook for longer with the lid on, checking frequently. You may need to add the juice of the remaining half lemon – and more sugar – if cooking for much longer.
- Pour the plums (with care – they’re hot) into a 23x6cm/9x3in deep ovenproof pie dish and set to one side. Already the red skins will have made a gorgeous garnet gravy. Sprinkle in two tablespoons of your amaretti crumble.
- To make the crumble the easy way, put the flour and baking powder into the bowl of a freestanding mixer, shake to mix, then add the small cold butter cubes and beat, not too fast, with the flat paddle until you have a mixture rather like large-flaked oatmeal. Or you can do this by hand, just by rubbing the butter into the flour with your fingers.
- Add the sugar and mix with a fork, then tip in the rest of the amaretti crumbs and use a fork to mix again. Pour the mixture over the waiting fruit in its pie dish, making sure you cover right to the edges to stop too much leakage: although for me, some of the rich-hued syrup spurting out over the crumble topping is essential.
- Place on the baking sheet in the oven and bake for about 30 minutes; you should see some ruby bubbling at the edges, and the top will be scorched gold in places. If you can bear it, let this stand for 10-15 minutes before eating, with ice cream, whipped cream or mascarpone.

Cheese “Crackies”
Posted: June 3, 2013 Filed under: Appetizers, Baking, Brunch, Snacks, Uncategorized | Tags: Cheese crackers, imperial cheese 42 Comments
I’m going to date myself. Do you remember that 80s Faberge Organics Shampoo Commercial where Heather Locklear says she told two friends about this fab shampoo, and they told two friends, and so on, and so on, and so on . . . ? (What, you weren’t born yet? Then click here and see the giggle-worthy commercials that us oldies grew up with.)
Anyway, this is how things went with my mom recently. She tried these cheesey, sorta but not quite crackers, at a friend’s place and couldn’t stop talking about them. Her other friends were intrigued. Then they tried them. Now a few of mom’s friends have requested the recipe and so did I. Your (rotary dial) phone line was busy, so I thought I’d be all new age and post the recipe here so that you can check them out. Then you can tell your friends, and so on. Get the idea?
The source of this cheesey kinda cracker-like recipe is mom’s friend Raymond, who goes to her church. Apparently Raymond has been making these cheesey bites for about 40 years and it’s one of his most requested recipes. Raymond is someone who really knows his way around the kitchen and has catered countless dinner parties over the years. While I’ve never met Raymond, my mom raves about his cooking abilities, so he’s got my vote of confidence.
I hope that Raymond doesn’t mind, but I’ve adapted his recipe–mostly because his secret ingredient, MacLaren’s Imperial Cold Pack Cheddar, is only available in Canada. I’ve also renamed them “crackies” because I’d describe them as a cross between a cracker and a cookie. And, I’ve spiced them up with rosemary and a sprinkle of fleur de sel, even though I usually make half the batch plain to keep the ponytails happy. My oldest daughter likes to take them for her school snack.

Cheese “Crackies”
Yield: approx 50 crackers
1/2 cup vegetable oil + 1 tbsp olive oil
1 cup flour
2 cups tightly packed grated old cheddar (orange)
1 tbsp Worchestershire sauce
t tsp dry mustard
2 cups rice crispies, crushed
2 tsp finely chopped fresh rosemary + a few unchopped rosemary sprigs
fleur de sel for sprinkling
Pulse all ingredients in food processor until mixture is smooth and well mixed; roll into balls the size of a quarter and flatten with a fork dipped in water. Bake at 350 degrees for 8 to 10 minutes.
Place one small sprig of rosemary and a pinch of fleur de sel (or sea salt) on top of each “crackie” after it has been flattened with a fork.
The crackies freeze beautifully. Reheat at 350 degrees for 8 minutes.
Raymond’s Original Version:
 Follow the instructions noted above, except replace the 2 tightly packed cups of grated old cheddar with one container of MacLaren’s Imperial Cold Pack Cheddar and do not add one extra tablespoon of vegetable oil (total amount of vegetable oil will be 1/2 cup) or the chopped fresh rosemary and fleur de sel.
NOTES:
- For crispy crackies, be sure to press them down well with a fork dipped in water until they are quite thin.
- To retain the crispness, they are best stored in a tin container, rather than plastic. Mom likes to freeze any uneaten crackies and crisp them up again in the oven before serving.
- If you live in Canada, I recommend trying this recipe using the Imperial cheese. Just eliminate the extra tablespoon of vegetable oil. The rosemary and fleur de sel are optional.
Mother’s Day: A Day to Embrace Being Perfectly Imperfect
Posted: May 12, 2013 Filed under: Uncategorized 37 Comments

I wrote the note below for Mother’s Day because I couldn’t stop thinking about how mothers can carry around a lot of guilt. We feel guilty for not doing enough. Guilty for doing too much. Guilty when we let our frustration or anger get the best of us. I’ve been trying hard to let go of all of this guilt and just enjoy the special moments as they come along. Moments like waking up to two little girls spilling over with excitement as they presented the gifts they’d made for Mother’s Day.
Perfectly Imperfect
As a daughter, I love my mom dearly.
As a mom myself, I love my children with a kind of love that I’d never known before they came into my life. A love that wants to protect, nurture and teach. A love that is fierce, strong and true.
But it is also a love that is perfect in its imperfections. Real motherly love has small scratchy, rough patches where you’ll sometimes find impatience, anger or annoyance.
It’s a test of wills. It’s a daily dance. It’s a marathon.
Motherhood is all about finding the energy and spirit to keep countless balls in the air, without dropping one . . . or not losing hold of “strong and true” mom to “tired and impatient” mom.
But it’s a battle worth fighting, an important role to play. It’s a job I’m proud to hold.
And, it makes me love my own mom even more . . . because I now know how much went into each and every milestone celebration, family meal and hard-learned life lesson along the way.
Today, love your mom . . . or remember fondly the mom you once loved and still hold in your heart. Love yourself. And most of all, love and accept being perfectly imperfect . . . because you’re certainly not alone.
To all of you who are mothers, daughters, grandmothers, aunties and friends, I wish you a very Happy Mother’s Day.
There’s no recipe today because, well, I think everyone needs at least one day off from the kitchen. Today, I highly recommend ordering in.
And before I sign off, I’d also like to apologize to all of my blogging buddies. I’m afraid that life has got in the way of commenting and posting lately. I promise I’ll be in touch soon.
In Praise of the Pomegranate
Posted: April 16, 2013 Filed under: Chicken, Salad | Tags: Eggplant, Pomegranate, Pomegranate molasses, Salad 85 Comments
Snooping on someone’s desk can get you into big trouble. But I know of one case where it lead to great things.
There was no way you could miss it. The bright photo on the cover of this book was like a neon sign that screamed “calling all foodies.”

Tell me that you wouldn’t have spotted this book under a pile of papers in the office and had a quick little look? Well? Am I wrong?
So, if you did lunge across your colleagues desk to thumb through Modern Flavors of Arabia, you too would have been rewarded with page after page of beautifully photographed dishes. And you likely would have run right out to the bookstore to buy it, just like I did.
I was immediately sold by the drool-inducing photos and the fact that many of my favourite local celebrity chefs (Anna and Michael Olson, Susur Lee and Lynn Crawford) have provided testimonials for the book. Of course I had to buy it.
You’d also note that pomegrante molasses and pomegrante seeds are featured prominently in the book, along with other ingredients such as cinnamon, pistachios, sumac, za’atar, orange blossom water and rosewater.
Thanks to my blogging friend Sawsan over at Chef in Disguise, I am becoming more familiar with many of these ingredients and the wonderful role that they play in Middle Eastern and Arabic cuisine.
Two recipes really jumped out at me right away, so I started with them: Arugula Salad with Roasted Eggplant and Sweet Pomegranate Dressing and Spicy Chicken Wings . . . although I adjusted the wing recipe and renamed it Sweet and Sticky Pomegranate Chicken Wings. I was extremely pleased with the results of both recipes and look forward to making my way through the rest of this book.
If you’re not up for buying this book, I hope I can convince you to at least buy a bottle of pomegrante molasses. Widely available at specialty and Middle Eastern stores, it can also be used to make refreshing drinks, dips and glazes for meat. If you do take the plunge, this terrific article from Food52 will provide you with a range of ways to use up your bottle.
If you have trouble finding pomegranate molasses, you can always make your own with this easy recipe from Simply Recipes.
So, a big thank you goes out to my colleague Maria, who casually left this book on her desk, under a few papers, when I was visiting her in Ottawa. It was kind of like laying out a piece of cheese and then waiting for the mouse to arrive . . .

Arugula Salad with Roasted Eggplant and Sweet Pomegranate Dressing
Recipe from Modern Flavors of Arabia
- 2 medium egglplants
- 2 – 3 tbsp olive oil
- sea salt
- 2 tsp whole fennel seeds
- 1 clove garlic
- 1/4 cup balsamic vinegar
- 1/4 cup honey
- juice of 1 lemon
- 1 tbsp dijon mustard
- 1/4 cup pomegranate molasses
- 1/4 cup extra virgin olive oil
- 4 large handfuls arugula, washed
- 1/4 small red onion, thinly sliced
- 2 cups cherry tomatoes, sliced in half
- 1/4 cup toasted pine nuts
- 1/4 fresh pomegranate seeds
Preheat the oven to 400˚ F.
Peel and cut the eggplants into thick rounds of about 1 inch thick, brush both sides with oil, sprinkle with sea salt and place on a shallow baking sheet. Place in the oven to roast until golden and cooked through, about 15 minutes. Remove, cool completely and slice each round in half. Set aside.
Using a mortar and pestle, crush the fennel seeds and garlic to make a paste. Add the balsamic vinegar, honey, lemon juice, dijon mustard, pomegranate molasses and olive oil. Whisk together to emulsify the dressing. Set aside.
Place the arugula on a shallow serving platter. Sprinkle the onion, tomatoes, salt and pepper on top. Toss to combine. Scatter the egglpant slices on the salad.
Drizzle some dressing all over. Garnish with pine nuts and pomegranate seeds. Serve immediately.
NOTE: I found that the recipe made about twice the amount of dressing that I needed. Next time I’ll cut the dressing recipe in half.
Sweet and Sticky Pomegranate Chicken Wings
Recipe adapted from Modern Flavors of Arabia‘s Spicy Chicken Wings
- 2 lbs chicken wings
- 4 cloves garlic, minced
- 1/4 cup olive oil
- 1/2 tsp cinnamon
- 1 tsp smoked paprika
- pinch cayenne pepper
- 1/4 cup honey
- juice of one lemon
- 3 tbsp pomegrante molasses
- salt and pepper
Make a marinade by mixing all of the ingredients together in a medium-sized bowl. Add chicken wings and toss well. Cover and leave in the fridge for an hour.
Preheat oven to 350˚ F.
Cover baking sheet with aluminum foil. Place wings spread apart on the baking sheet. Bake for 30 minutes. Increase temperature to 375 ˚ F and cook for an additional 20 to 30 minutes, until the wings are well cooked and the glaze is sticky and carmelized.
NOTE: The original recipe called for 1 tsp of cayenne pepper and 1/4 cup of fresh cilantro (chopped). It is also served with a hot tomato salsa. I modified the recipe to make it work for my two young girls. It also recommended cooking the wings for 35 minutes at 350˚, but I found they needed quite a bit more time to cook well and carmelize.
A Little Taste of Paris
Posted: April 4, 2013 Filed under: Baking, Cookies, Uncategorized | Tags: Lemon madeleines 55 Comments
A visit to our local patisserie is the closest I’m going to come to a visit to Paris for quite some time I’m afraid. Although, I think I gain weight just looking at the rows and rows of sugary, buttery masterpieces.
As luck would have it, we have to pass by the patisserie every weekend after my daughter’s Saturday morning ballet class on our way to swimming. Of course the only way to make it through our hectic schedule is to pick up a snack somewhere convenient . . .
There’s always a long line up at the patisserie and by the time we get to the counter they’ve usually sold out of our favourite snack: mini madeleines. (In case you are not familiar with them, madeleines are small sponge cake-type cookies distinguished by the shell pattern that comes from using a special pan.) My daughter just LOVES them and so I spend the next hour convincing her that the goldfish crackers I’ve packed in my purse are even better than madeleines.
To avoid the constant disappointment and the $7 for a small bag, I finally decided that I needed to try my hand at making them myself. All I can say is that they’re going to miss us at the patisserie. I think that mini madeleines may become my new signature cookie. The $9 for the special madeleine pan was definitely money well spent — and it is a lot cheaper than a trip to Paris.

Mini Lemon Madeleines
Makes about 80 cookies.
Recipe ever so slightly adapted from David Lebovitz
3 large eggs, at room temperature
2/3 cup (130g) granulated sugar
pinch of salt
1 1/4 cup (175g) flour
1 teaspoon baking powder (optional) (I added this)
zest of one small lemon
9 tablespoons (120g) unsalted butter, melted and cooled to room temperature, plus additional melted butter for preparing the molds
1/4 cup of icing sugar (for dusting)
Directions
1. Brush the indentations of a mini madeleine mold with melted butter. Dust with flour, tap off any excess, and place in the fridge or freezer.
2. In the bowl of a standing electric mixer, whip the eggs, granulated sugar, and salt for 5 minutes until frothy and thickened.
3. Spoon the flour and baking powder, if using, into a sifter or mesh strainer and use a spatula to fold in the flour as you sift it over the batter. (Rest the bowl on a damp towel to help steady it for you.)
4. Add the lemon zest to the cooled butter, then dribble the butter into the batter, a few spoonfuls at a time, while simultaneously folding to incorporate the butter. Fold just until all the butter is incorporated.
5. Cover the bowl and refrigerate for at least 1 hour. (Batter can be chilled for up to 12 hours.)
6. To bake the madeleines, preheat the oven to 425 degrees.
8. Plop enough batter in the center of each indentation with enough batter which you think will fill it by 3/4′s Do not spread it.
10. Bake for 5-6 minutes or until the cakes just feel set.
11. Remove from the oven and tilt the madeleines out onto a cooling rack.
12. Sift icing sugar over madeleines (shell side up).
Storage: Madeleines are best eaten the day they’re made. They can be kept in a container for up to three days after baking, if necessary.
NOTES:
- I didn’t put the madeleine pan in the fridge before baking, but I did refrigerate the batter for an hour or so before baking.
- I adjusted the baking time in David’s original from 8 or 9 minutes to 5 or 6 minutes for the madeleines. All of my cookies cooked in 5 minutes.
- I did not use the lemon glaze on any of my cookies. I wanted the delicate and buttery flavour of the cookies to stand on its own.
- I recently bought my mini madeleine pan at Tap Phong in Chinatown. It makes 20 cookies per batch.(Remember the shopping excersion I was supposed to go on with Eva? Hopefully we can reschedule now that she’s managed to shake her cold.)
Jerk Chicken: No Problem, Mon
Posted: March 20, 2013 Filed under: Chicken | Tags: Jerk Chicken 87 Comments
Flavours of Jamaica: nutmeg, whole pimento (allspice) berries, scotch bonnet peppers, lime and rum.
Does this picture immediately make you think of Jamaica?
The scotch bonnets and Appleton Estate Rum are likely to get you headed in the right direction. But did you know that allspice berries are also quintessentially Jamaican? It’s true! Jamaica is one of the leading producers of allspice, but it’s called pimento or Jamaica Pepper there. The spice came to be called allspice because it displayed the flavour and aroma of cloves, nutmeg, cinnamon and pepper–all combined in one spice. Nutmeg is another spice commonly grown in Jamaica and it is encased in a hard shell which is easily cracked to get to the nugget of spice within.
So why the sudden interest in Jamaica? You’ve probably guessed that I’ve just returned from a Jamaican get-away . . . and as usual, you are right. Boy, the world looks a whole lot different after you’ve had a restful vacation, doesn’t it? I can’t begin to tell you what a difference it has made in so many ways. The best part was spending time as a family without cell phones, computers or television. We really connected and enjoyed our time together, but our favourite family experience was climbing Dunns River Falls. (Our tour guide Tammy made it her personal mission to get both of our girls to the top of the falls safely. They sure were in good hands with Tammy.)
The trip was a big success on all fronts. Beyond all the wonderful experiences, I was happy because I was able to load up on Jamaican spices and Rum Cream Liqueur . . . and the girls were happy because they came home with a souvenir that they love: braids!

One of the trip’s highlights was our daily lunches at the hotel’s jerk pit, which overlooked the ocean. Of course I had hot dogs all week. Just kidding! It was all jerk, all week long for me. I gradually worked my way up to the hell fire jerk sauce and boy was it spicy! They say that Jamaican jerk burns you twice: once on the way down and once on the way out. (Sorry!)

The Jerk Pit at the Gran Bahia Principe
- After getting to know jerk so well in Jamaica, I had to recreate it for you when I got back home.
Jerk refers to both the cooking technique and the spice seasoning. I’ve opted for a wet marinade because it is known to produce jerked meat that is much moister and sweeter than dry rubs. Recipes for jerk marinades vary according to tastes and regional traditions. I’ve included all the key ingredients that are common in jerks–allspice, nutmeg, cinnamon, scotch bonnets and soy sauce (yes, this is authentic and reflects the longstanding influence of the Chinese emigrants in Jamaica).

My oldest ponytail helped with all steps involved in making this jerk chicken and side dish (red beans and rice), as she was working on one of her Brownie badges. But don’t worry, I didn’t let her touch the scotch bonnets!

Jamaican Jerk Chicken
- 1/4 cup lime juice
- 3 tbsp olive oil
- 2 tbsp dark rum
- 2 cloves of garlic
- 1 scotch bonnet pepper, seeds removed and minced (be sure to wear gloves!) *
- 6 green onions, chopped
- 2 tbsp soy sauce
- 2 tbsp brown sugar
- 3 tsp ground pimento (allspice)
- 2 tsp dried thyme
- 2 tsp ground ginger
- 2 tsp cinnamon
- 1 tsp nutmeg
- 1 tsp salt
- 1/2 tsp black pepper
- 3 to 4 lb whole chicken, backbone removed and quartered (see instructions for spatchcocking a chicken to learn how to remove the backbone)
* increase to 2 scotch bonnets if you like your jerk spicy
Directions
Mix all ingredients together in a food processor until well blended.
Pour the marinade over chicken pieces and rub in well. Cover and refrigerate for a minimum of one hour, preferably overnight.
Preheat barbeque; grill chicken on low-medium heat for 45 minutes, turning once for the last 10 minutes, until juices run clear.
If using the oven, cook at 350 degrees for 45 to 50 minutes until juices run clear. (Note: if you are cooking in the oven, you could add a bit of liquid smoke to your marinade to give the jerk chicken that authentic smoking flavour that comes from the barbeque.)
Source: I used this recipe from Epicurious as a starting point in developing this recipe.
NOTE: I marinated the chicken overnight and reserved some of the marinade to serve with the chicken when cooked (as you’ll note in the photo). However, while the flavour of the marinade was lovely, I didn’t like the consistency of the marinade the next day. I recommend that you eat the marinade the same day if you want to serve it with your cooked chicken.
Jamaican-style Peas and Rice (Red beans and Rice)
- 2, 19-oz tin red kidney beans, drained and rinsed
- 1 cup coconut milk
- 1 cup long grain white rice
- 2 1/4 cup water
- 1 tsp salt
Directions
Combine rice, water and salt in a medium sized microwave-safe bowl. Cook for 10-13 minutes in microwave until water is absorbed (I start with 10 minutes and then cook in one minute intervals until all the water is absorbed). On the stove top, combine kidney beans and coconut milk in medium sauce pan; simmer on low for 10 minutes. Add cooked rice and cook on low for 5 minutes until well incorporated. (Alternatively you could substitute 1 cup of the water with 1 cup of coconut milk when cooking the rice, rather than adding the coconut milk to the cooked rice. I prefer the former method because I find the rice has a creamier texture this way. You could also add sauteed onions and other spices, but my daugther preferred to omit the onions.)
Loaves and Dishes
Posted: February 25, 2013 Filed under: Baking | Tags: Banana Bread, Coconut oil, Lemon poppy seed loaf 97 Comments
I have two current obsessions: making loaves of quick bread and buying unique or pretty dishes to add to my collection.
One obsession makes my family happy. The other gets me into trouble because we’re running out of cupboard space to put all of the dishes.

A few favourite dishes: tea cup from Greece; square plate from Mexico; beloved platter from Grandma; lovely new blue bowl and a saucer bought on honeymoon in Florence.
There are just so many reasons to make a loaf of quick bread: it’s a great way to use up ripe bananas; it packs up nicely as a school or work snack; they make great gifts; and you can mix up all the ingredients and pop it into the oven in five to ten minutes. Although I think my favourite reason is the way the house smells when you’re baking a loaf—it takes you right back to childhood.
With any luck, the loaves will keep my husband in a sugar coma long enough that he’ll stay out of our overflowing cupboards and won’t discover all the new dishes I’ve bought recently. Although I think it’s too late—my friend Nancy was commenting on the weekend about all the new dishes she’s noticed in my recent posts.
Okay then, I guess my best bet is to win him over with the cost savings of the Lemon Poppy Seed Loaf. The girls absolutely love the version that you get at Starbucks—but a family visit to Starbucks these days comes close to setting you back as much as your monthly iPhone bill if everyone splurges on a drink and a snack. That was the incentive for coming up with this version of Lemon Poppy Seed Loaf, as I’d much rather spend my spare money on dishes save money to pay down our mortgage.

If that doesn’t work, there’s always Coconut Chocolate Chip Banana Bread. My oldest daughter started requesting a new version of banana bread . . . she was getting sick of my Butterscotch Chip Wholewheat Banana Bread. That lead to thinking that I needed to try the coconut oil that I’ve been reading about all over the blogsphere in my recipe. Have you tried baking with it yet?
If not, you really should. I reckon that it’s better for you than broccoli—and it tastes a lot better too. According to Dr. Oz, it can help our bodies resist illness-causing viruses and bacteria; boost thyroid function helping to increase metabolism, energy and endurance; increase digestion and help to absorb fat-soluble vitamins; and help fight off yeast, fungus and candida.
I’m meeting my friend Eva tomorrow after work to go shopping at Tap Phong Trading Company in Chinatown. It’s a great place to buy dishes and cooking utensils at great prices. Do you think I need to bake another loaf this week?

Coconut Chocolate Chip Banana Loaf
- 1/4 cup coconut oil, melted (measured solid)
- 3 ripe bananas, mashed
- 1 egg
- 1 tsp vanilla
- 1 cup sugar
- 1 cup all purpose flour
- 1/2 cup whole wheat flour
- 1 tsp baking soda
- 1 tsp salt
- 1/2 cup chocolate chips
- 1/2 cup shredded coconut
Directions
- Preheat oven to 350° and grease 9 ½“ x 5 ½“ loaf pan
- Mix dry ingredients (flours, salt, sugar and baking soda) in small bowl and set aside.
- Mix wet ingredients (bananas, egg, melted coconut oil and vanilla) in large bowl. Add in the dry ingredients and mix well. Stir in chocolate chips and shredded coconut until incorporated.
- Pour batter into greased loaf pan.
- Bake for 45 – 55 minutes, or until an inserted toothpick comes out clean.

Lemon Poppy Seed Loaf
- 2 cups flour
- 1 cup sugar
- 1 tsp baking powder
- ½ tsp baking soda
- 1 tsp salt
- ½ cup oil
- ½ cup sour cream
- ½ cup milk (I use 1%)
- ¼ cup lemon juice
- 2 eggs
- 1 tsp vanilla
- 2 tsp lemon zest
- 1/3 cup poppy seeds
Drizzle
- 1 cup icing sugar
- 1 tbsp lemon juice
- 2 tsp milk
Directions
- Preheat oven to 350° and grease 9 ½“ x 5 ½“ loaf pan
- Mix dry ingredients (flour, salt, sugar, baking soda and baking powder) in small bowl and set aside.
- Mix wet ingredients (oil, sour cream, milk, eggs, lemon juice, lemon zest and vanilla) in large bowl. Add dry ingredients to the wet ingredients and mix well. Add poppy seeds.
- Pour batter into greased loaf pan.
- Bake for 50 – 60 minutes, or until an inserted toothpick comes out clean.
- Allow loaf to cool completely. Mix drizzle ingredients in small bowl and spoon glaze over bread.
Dinner With A Couple Of Little Rats And Roosters
Posted: February 14, 2013 Filed under: Chicken, Cookies, Mains, Pork | Tags: Celebrations, Chinese New Year, Chinese Spare Ribs, Dark soy sauce, Stir-fry, Sweet and Sour Sauce 43 Comments
Dumplings, Sweet and Sour Sauce, Soy Dipping Sauce and Chinese Spare Ribs Braised in Soy Sauce
It didn’t take long for me to figure out that the ponytails were fired up about Chinese New Year. My oldest daughter was working on writing a short play about it and was talking non-stop about how great it was to be a rooster (her Chinese zodiac animal). Meanwhile my youngest daughter was counting down the days until the Chinese New Year parade at school.
Don’t you love the way children find such joy in learning new things?
We really want to encourage and embrace this interest the girls have in different cultures and traditions. So, I bought them each a children’s book about Chinese New Year on my way home from a business trip and decided that we would celebrate it too.
Soon after that I asked my colleague Amanda if she could recommend a few authentic Chinese dishes. But she didn’t just provide me with some ideas—she surprized me with a very large carrying case full of all the essentials for a Chinese New Year celebration: decorations, candies, sauces and noodles. I was blown away by her generosity!
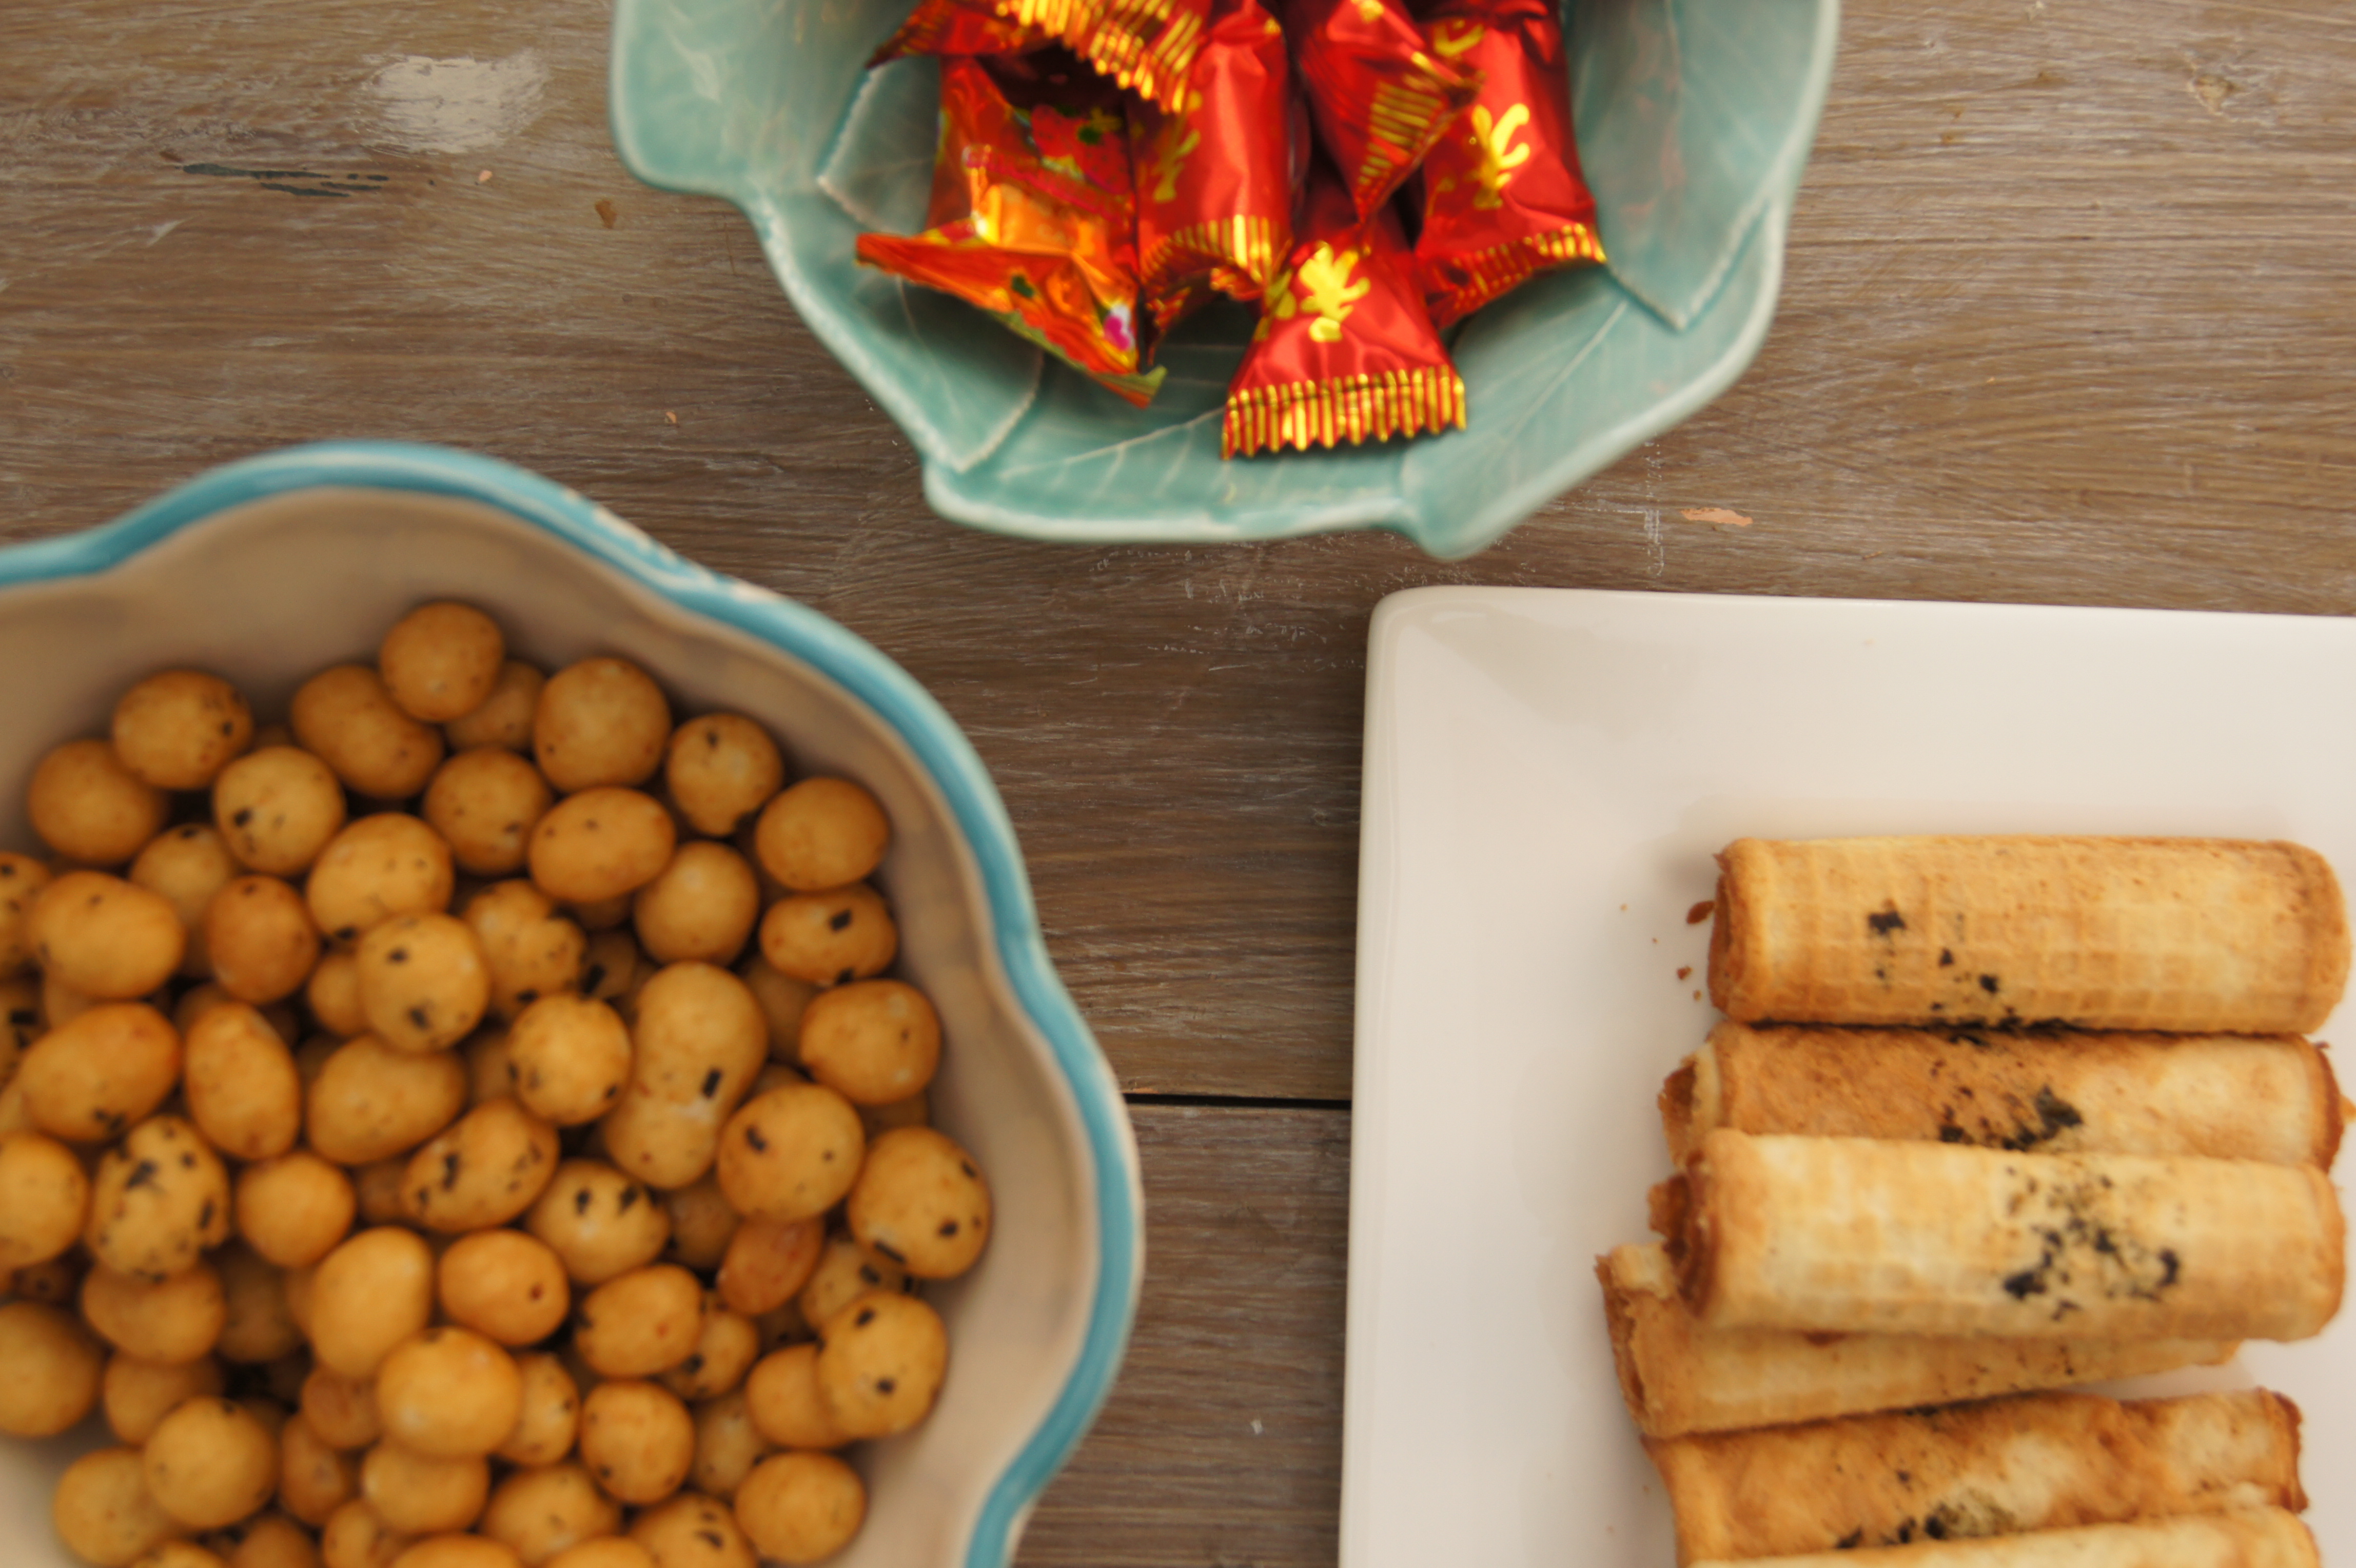
Some of the treats from Amanda: crunchy peanuts, candies and Korean crackers.
However, we did encounter a set-back. At the last minute, my husband was asked to go to an important work event on Feb. 1oth. But after Amanda’s kind gesture, there was no turning back. Close friends Carolyn and Glen agreed to join the girls and I for our celebration. With two young daughters the same age as the ponytails, it would mean an evening with two little rats and two roosters (according to their Chinese zodiac animals of course)!
Armed with a great dumpling recipe from Amanda, I set out to research some other ideas for our feast. Two bloggers came to mind immediately: Norma from Garden to Wok and Sissi from With a Glass. Norma teaches cooking classes and has written two cookbooks: My Students’ Favorite Chinese Recipes and Wokking Your Way to Lowfat Cooking. An avid gardener, she also keeps her loyal readers up-to-date on the adventures in her garden with regular Harvest Monday posts. Based in Switzerland, Sissi has a flair for creating innovative recipes that are inspired by her love of a diverse range of cuisines, particularly Asian and Hungarian cuisines. I met Sissi in the early days of blogging and I’ve been a fan of her site ever since.
When I saw Sissi’s Chinese Spare Ribs Braised in Soy Sauce I knew that I had to make them. They looked sticky and fall-off-the-bone good. Well, I can tell you that they didn’t disappoint. Best. Ribs. Ever. OMG, you must make these ribs. The flavour combination of the dark soy sauce, star anise and cinnamon is really incredible. However, you MUST use the dark soy sauce (which I had never used before) because the regular soy sauce simply will not achieve the same result. The dark soy sauce is thicker and more intense in flavour than regular soy sauce.

Sissi’s Chinese Spare Ribs Braised in Soy Sauce
I also returned to Norma’s Shrimp Stir-fry recipe that I’ve made a number of times with great success, but I used snow peas in place of the asparagus this time. This dish went really well with the Chinese noodles that Amanda gave us. Best of all, it’s a low-fat recipe!

Norma’s Shrimp and Snow Peas Stir-fry
I also found inspiration from the online version of one of my favourite magazines, House & Home. The lemon sauce for this chicken is nothing like the version that you get at a restaurant or with your favourite take-out. You’ve got to try this Lemon Chicken recipe—the flavour is just amazing.

Lemon Chicken
Almond cookies are a traditional way to end a Chinese New Year celebration and kids love them. The texture of these cookies was spot on with what I’ve had in restaurants—they had a bit of a crunch but still melted in your mouth. Next time I make them I’m going to play around with the recipe, as I prefer not to use shortening in my baking.

Almond Cookies
And what celebration would be complete without a live performance? Our two adorable roosters and rats entertained us with original songs such as: We Are the Roosters; Sweet Love and a rap song entitled Hurricane.

Two cute “rats” ham it up.

Rockin it out with the rats and the roosters!
It was a night of great food, with great friends. In fact, we had so much fun that I think this just might become an annual celebration for us. Now I just need to find a way to repay Amanda’s generosity. Any suggestions?
Recipes from Our Chinese New Year Celebration
Sissi’s Chinese Spare Ribs Braised in Soy Sauce
Norma’s Shrimp With Snow Peas Stir-Fry
Lemon Chicken from House & Home Magazine
Sissi’s Baked Wonton Crisps and Sweet and Sour Sauce from Chow.com
Almond Cookies from Canadian Living
Pork Dumplings
Adapted from Amanda’s recipe
- 1 lb ground pork
- 1 tsp cornstarch
- 1 tsp soy sauce
- 1 tsp sesame oil
- 1 tsp salt
- 1 tbsp white wine
- 2 tbsp chopped chives
- 1 clove garlic, minced
- 1 package of dumpling wrappers
Dipping Sauce
- 1/4 cup soy sauce
- 1 tsp sesame oil
Mix all ingredients (except dumpling wrappers) well in a large bowl.
Place a level tablespoon of filling in the centre of each dumpling wrapper. Moisten edges with water. Fold in half and pinch together to create a pouch that seals in the mixture. Alternatively, you could use a dumpling or ravioli maker as I did that automatically seals each dumpling. I did need to double check each dumpling and pinch any spots where it wasn’t completely sealed by the ravioli maker. Repeat with remaining wrappers and filling.
Steam the dumplings for 10 to 12 minutes. (Use a pan/wok of boiling water and bamboo baskets for steaming.) Alternatively you can boil them in water for 5 to 6 minutes. They can also be fried afterwards (but I didn’t do this).
For the dipping sauce, mix the soy sauce and sesame oil in a small bowl. Serve with the dumplings.

Thanks to Sissi’s suggestion, I used my ravioli maker to make the dumplings.
Tips/Notes:
- I followed a tip from Sissi and used a ravioli maker to make the dumplings. It worked really well. You could also use a dumpling sealer, but I didn’t have one.
- I used 2 kg of pork ribs, so I tripled Sissi’s recipe for Chinese Spare Ribs Braised in Soy Sauce. Be sure to cut the ribs into individual portions as this is key to the success of the recipe. However, I didn’t cut the ribs in half vertically as Sissi did and I was still happy with the results.
Can Cupcakes Mend A Broken Heart?
Posted: February 4, 2013 Filed under: Baking, Cupcakes | Tags: Chocolate, Oreo cookies 95 Comments
It was a gift from my mom for my 20th birthday and I knew we were destined to be the best of friends. It was stylish, yet practical. Not too big, not too small. Just the right size to hold a summer’s worth of shorts and tees . . . and a souvenir or two from my travels. It was the cadillac of backpacks. And it was all mine.

And while it has definitely seen better days—it’s faded and well-worn at the seams—it remains a treasured possession. A dear old friend.
Recently my old backpack set off on a new adventure, with a brave new explorer. My trusted old friend went to camp with my seven-year old ponytail. It was her first weekend away.

I was quite excited about my daughter’s milestone adventure with her Girl Guide Brownie Troop until we started loading up my old backpack with her weekend essentials. All of a sudden I was overwhelmed with emotion. Wasn’t it just yesterday that I was setting sail on one of life’s great adventures myself? Okay, so this time it’s camp. Next time it’ll be Europe, right? Where’s the pause button?
There were definitely tears. But not from me. (Okay, I did come very close.) The tears were from a younger sister who was utterly devastated to be excluded from this grand adventure. I needed a distraction.

So I pulled out my baking pans and we set to work. Within no time, the cloud of flour in the air and cookie crumbs on the counter, floor and all over my ponytail’s little face worked their magic. The injustice of being younger was soon forgotten.
The thrill of an oreo in every cupcake was the perfect diversion.

And something to look forward to once they were baked and decorated.

Oreo cupcakes + dinner with a best friend from kindergarten = a very happy little ponytail.
As for mom? Well, she enjoyed the cupcakes too . . . but she has realized that she needs to cherish every last minute with each of her two little ponytails. Even those times when she wants to pull out her hair from all the craziness and the tantrums . . . because one day that backpack will be headed for Europe. What do you think the odds are that the girls will take me too?

Oreo Cupcakes
Cupcake recipe from Bakerella
Cupcakes:
- 1- 1/2 cups all purpose flour
- 1/2 cup natural unsweetened cocoa
- 1- 1/4 cup sugar
- 3/4 tsp baking soda
- 1/2 tsp baking powder
- 1/2 tsp salt
- 2 eggs
- 1/2 cup vegetable oil
- 1 tsp vanilla
- 3/4 cup milk
- 3/4 cup hot water
- 22-24 Oreos
Directions:
- Preheat oven to 350 degrees.
- Line tray with baking cups.
- Place one whole cookie in each cup.
- Mix the flour, cocoa, sugar, baking soda, baking powder and salt in a large mixing bowl using a wire whisk.
- Add the eggs, oil, vanilla and milk and mix well until thoroughly combined. Add the hot water and mix until combined.
- Using an ice cream scoop transfer the batter into each baking cup so it’s about three quarters full. Makes 22- 24 cupcakes. (Yield was 23 for me)
- Bake for 18-20 minutes.
Oreo Buttercream Icing
(Adapted from my Peanut Butter Buttercream Icing Recipe)
- 2 sticks unsalted butter, softened
- 3- 1/2 to 4 cups icing sugar
- Pinch salt
- 1 teaspoon vanilla extract
- 2 tbsp milk
- 6 tbsp crushed cookie crumbs (approx 5- 6 oreos)
In a standing mixer fitted with the whisk attachment, beat the butter at medium-high speed until smooth, about a minute. Add 2½ cups icing sugar and salt; beat at medium-low speed until most of the sugar is moistened, about 1 minute. Scrape down the bowl and beat at medium speed until mixture is fully incorporated, about 30 seconds; scrape bowl, add vanilla and milk, and beat at medium speed until incorporated, about 20 seconds. Add remaining one to one-and-half cups of icing sugar and beat until incorporated. Then increase speed to medium-high and beat until light and fluffy, about 4 minutes, scraping down bowl once or twice. Add cookie crumbs and beat on medium-high for one minute until well incorporated.
Frost the cupcakes when cool.
Decorate with mini oreo cookies (optional)

